A Guide for GGSE Website Editing
This is page is for Epsom Division website editors and contains all the vital information you need to know for maintaining and updating the website
Domain Registration is with FASTHOSTS (https://www.fasthosts.co.uk/login) registered with the treasurer (jgandpnjh@aol.com)
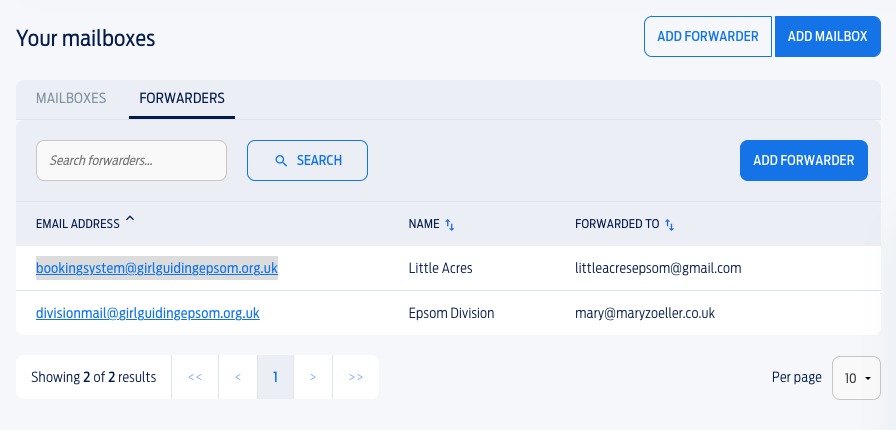
There are two email addresses set up as forwarding addresses only
Website hosting and administration is by LWDesign (https://www.lwdesign.co.uk) Lee Wayland <lee@lwdesign.co.uk
Using the Divi Builder
The website is built on WordPress using Divi builder and our own ggse theme. Check out online guide to using the Divi Builder at the link below.
Rows and Boxes can be easily be added, duplicated and moved around (see the Divi Builder link for how to do this). Try to not to change font sizes , spacing or settings, especially not by dragging the edges of boxes. It can really mess things up.
Getting Started With The Divi Builder | Elegant Themes Documentation
Adding Pages
You can build a page from scratch or by cloning an existing page
Probably best to get a starter lesson from someone who has already done this. We have saved some of the Website styles to the library which can be used to get started. To maintain the integrity of the website we should all try to maintain the elements of the design that are found across the website
Editing Pages
Editing pages is best done from the page itself: Click on “enable visual builder” in the WordPress menu at the top of the screen. You can edit directly in the boxes , but it is best to hover and use the “settings” cog and edit text there as it can jump around if editing dierctly on the page.
Click on the big purple circle with 3 dots that appears at the bottom of the screen to access:
- Save option on the LHS and
- RHS: the option to view you page in desktop, tablet or phone mode.
It is important to check phone mode, as this is how a LOT of people will be acessing the website and content.
If you use Exit Visual Builder you have the option to Discard and Exit or Save and Exit – useful if you messed up and want to go back to where you started or if you forgot to save
You cannot test links in editing mode. You need to exit the visual builder first
Photos
Photos need to be prepared before loading to the website. The size of the loaded photo implacts the layout of the page, so in order to keep everything looking good this is an important step. Resolution is important too. Try to get hold of original photos taken with good quality cameras or phones.
- If resolution is too low the images may not resize properly between desktop, tablet and phone.
- If image too large it may appear too big in certain views, it takes up unnecessary storage and may not load.
For link boxes photos need to be square and if at all possible the pixel size should be 1080 x 1080
For heading banners, and featured images for news posts, gallery and events use pixel size of 1920 x 1080 (landscape). This is a ratio of 16:9 if you can’t acheive the resolution.
I use Paint 3D to resize and crop using pixels. Don’t try and edit picture size within WordPress- it can go wrong! Do this before loading to the Media
- Right click on the image in question a chose Edit in Paint 3D
- Go to “Canvas” and reduce width pixels to 1920 or 1080 (if require a square image) . Can crop first if want to select a specific area and then reduce the pixels
- You can increase pixels, but be careful, if you increase too much you get a very poor pixellated picture.
- Go to “Crop” annd chose 16:9 or 1:1 or simply type 1080. Adjust positioning as required
- Use Save As so as not to lose the original photo, you may want to change the focus or shape
Adding News Posts
News Posts are best not built in Divi Builder, unless you want to publish a photo gallery for an event.
Give your post a Title; set a featured image (RH menu at the bottom) and type your text in main box. You can add other media into the body of the post, but there is not much control about how this is positioned – It’s a bit trial and error and needs viewing on both desktop, phone and tablet to make sure it has worked.
Type a shortened verison of your story into the Excerpt box, if the autofilled vesrion does not work on the news carousels.
Remember to use “Quick edit” to turn off comments and pings.
Events Calendar:
Adding Events and Training
The Events calendar can be used to advertise events, redirect to other websites and book places on events and training courses.
Everything gets added on the events calendar and the categories are used to determine what shows up on which webpage.
Remember to turn off comments and pings
Filtering Events and News Items for specific pages (using categories)
Using categories in your posts allows you to search easily for items. You can also create news carousels etc that only display a particular category of interest e.g. awards or events
Adding a pdf document link
Take care to do this using the instructions below – essentially once you have uploaded your document copy the URL from the media item, rather than using the document picker to select it. By doing this you endure you open the pdf rather than a picture version of it…
Retention / Guidelines
Guidelines / Process for clean up of old items
EPSOM DIVISION NEED TO DECIDE THEIR OWN GUIDELINES _ the info here is from the County page
Newsletters and Updates
- County updates – Up to 2 years. On first publication of the year – move the previous year to archive and start the current years archive
- Spring/Summer Newsletters. Currently Go back to 2016 – Suggest 5 years retention then archive on the website.
- Annual Growth Reports – Currently back to 2012 – Suggest 10 years retention then archive on the website.
Photos
- Guidelines to be decided
- Photo naming is important – Can be used for filtering and housekeeping
- Photos/images associated with News posts should be deleted when post is deleted
Events and Posts
News Posts – 5 years?
Events – once event has passed, but select number may be kept to create future events.